

Note – If you want to use this plugin right away, you can download the ready-to-install version from the WordPress plugins directory.
WordPress is a hugely popular content management system used by hundreds of millions of sites across the internet to build websites and blogs. In fact, it bills itself as “the world’s most popular website builder.” By some estimates more than 20% of small and self-hosted sites use WordPress. Since it is free, open source, and easy to set up, even the smallest web publishers can use it without any barriers. However, its power and flexibility allow WordPress to also power huge sites such as The New Yorker, Tech Crunch, and Disney. Even the official website of Sweden is powered by WordPress.
Among its many strengths, WordPress is well known for its open and extensible architecture that allows thousands of contributors to build extensions that other WordPress users can easily use. These extensions, known as plugins, can be downloaded and installed by WordPress administrators with just a few clicks. In this article, we will use the WordPress extension architecture to walk you through the process of creating a WordPress plugin to display the weather forecast for any location world wide. We will do this using the WordPress shortcode API and the the Visual Crossing Weather API for the forecast data.
What is a WordPress Plugin?
Before we start writing code, we need to take a moment to define what we are building and the technologies that we will use in the process.
A WordPress plugin is a standalone set of code that enhances and extends the functionality of WordPress. Developers use a combination of PHP, HTML, CSS, JavaScript/jQuery, and potentially other web programming languages in conjunction with the WordPress API. In this way, a plugin can add new features to any part of a WordPress website as well as the Admin Control Panel.
One major benefit of WordPress plugins is that they are standalone. They do not physically alter any of the WordPress core code. This makes them easy to install and copy into any WordPress installation. This also allows them to be installed and uninstalled safely without undue risk of breaking the main site’s functionality.
What are WordPress Hooks and Functions?
WordPress hooks are the API mechanism by which plugins interact with the WordPress core. Using hooks, a plugin can safely modify the behavior of WordPress and the WordPress site without having to modify the core code itself. There are two types of hooks, action and filter. Action hooks allow plugin code to insert itself into the action of WordPress execution and perform its own tasks at specific times. Filter hooks allow a plugin to accept a piece of data, modify that data in some custom way, and then pass that data back into the main WordPress execution flow. We will use both of these hook types in our plugin implementation.
Our code will also use WordPress functions. There are hundreds of built-in functions for various tasks. When creating a WordPress plugin we will always use the built-in function if there is one available for our needs. This helps to make our code more portable across various versions of WordPress and heavily customized WordPress installations.
What is a Shortcode?
In this plugin we will use the WordPress shortcode system. Shortcodes allow any content author to insert our custom content, in this case a weather forecast, into any WordPress page, sidebar, or other content. Shortcodes achieve this by being a simple, parameterize macro string that can be embedded nearly anywhere in WordPress content.
In WordPress, a shortcode is a condensed representation of a larger and often more complex piece of code. In other words, a shortcode allows an author to insert a script within the content section of a post or page. When WordPress renders that content, it will execute the script and embed the results into the output content in place of the shortcode macro.
The format for a shortcode is [shortcode-name attributes]. To use a shortcode the author simply puts the name of the shortcode in brackets followed by any parameters. These parameters are known as shortcode attributes. From a content author’s point of view, shortcodes are an extremely simple and convenient way to use the functionality of a plugin.
Creating the plugin structure
We can now begin creating our weather forecast plugin. In our WordPress plugin architecture we will use generally accepted standards to have specific directories and files for specific parts of our plugin.
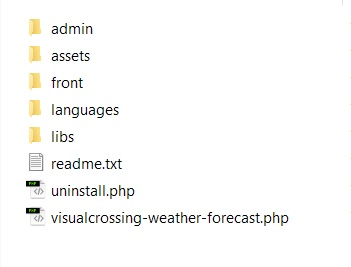
- admin – Inside the admin directory we’ll place all of the administration code for our plugin. In our plugin this will be PHP code.
- assets – The assets directory will contain media files that our plugin uses. In general this type of content include images and CSS. In our weather forecast plugin, the content is the JavaScript forecast rending code which comes from a Visual Crossing Weather sample and our logo images.
- front – This directory will contain the front-end-related code. That is the main code that renders our weather forecast. Just like the admin folder, this will contain PHP code.
- language – The language directory contains the translation files for the text strings in our plugin’s user interface.
- libs – This directory contains any required library code that we will use inside the plugin.
- At the root level we store a few key files. Besides the readme file, there is the primary plugin code file and the code file that controls the uninstall process.
Building the plugin code
Note – Below we will discuss key sections of the code, but not show some of the more minor details. However, the full code is available if you want to see the details of the fully working plugin. Feel free to download the code, learn from it, and modify it for your own use however you wish. If you make improvements or your entirely own version that does something cool, please let us know.
Our next task is to assemble the primary PHP code for the plugin. We will start with the main PHP file at the top of the structure, visualcrossing-weather-forecast.php. This is the main file that brings our components together. As such, it doesn’t directly do much work itself. Instead, it sets up the required variables and hooks that makes the plugin pieces work together within the WordPress framework.
One thing that we must do is to define our static values including the name and location of our plugin directories.
protected function define_defaults(){

    // Plugin Name.
    if ( ! defined( 'VISUALCROSSINGWFCST_PLG_NAME' ) ) {
        define( 'VISUALCROSSINGWFCST_PLG_NAME', 'Visualcrossing Weather Forecast' );
    }

    if ( ! defined( 'VISUALCROSSINGWFCST_PLUGIN_FILE' ) ) {
        define( 'VISUALCROSSINGWFCST_PLUGIN_FILE', __FILE__);
    }
    // Plugin Folder Path.
    if ( ! defined( 'VISUALCROSSINGWFCST_PLUGIN_DIR' ) ) {
        define( 'VISUALCROSSINGWFCST_PLUGIN_DIR', plugin_dir_path( __FILE__ ) );
    }
    // Plugin Folder URL.
    if ( ! defined( 'VISUALCROSSINGWFCST_PLUGIN_URL' ) ) {
        define( 'VISUALCROSSINGWFCST_PLUGIN_URL', plugin_dir_url( __FILE__ ) );
    }
    // Plugin Assets Folder URL.
    if ( ! defined( 'VISUALCROSSINGWFCST_ASSETS_URL' ) ) {
        define( 'VISUALCROSSINGWFCST_ASSETS_URL', VISUALCROSSINGWFCST_PLUGIN_URL.'assets/');
    }
    // Plugin Base Name
    if ( ! defined( 'VISUALCROSSINGWFCST_PLUGIN_BASENAME' ) ) {
        define( 'VISUALCROSSINGWFCST_PLUGIN_BASENAME', plugin_basename( __FILE__ ) );
    }

    // Plugin Required Constants
    if ( ! defined( 'VISUALCROSSINGWFCST_PHP_VERSION_REQUIRED' ) ) {
        define( 'VISUALCROSSINGWFCST_PHP_VERSION_REQUIRED', '5.6.0' );
    }
    if ( ! defined( 'VISUALCROSSINGWFCST_WP_VERSION_REQUIRED' ) ) {
        define( 'VISUALCROSSINGWFCST_WP_VERSION_REQUIRED', '4.4' );
    }
}
We also need code to check the minimum version requirements for our plugin. In our case, the method looks like this.
public static function requirements_check(){

    $requirement_error = array();
    //PHP Version check
    if( version_compare(PHP_VERSION, VISUALCROSSINGWFCST_PHP_VERSION_REQUIRED, '<') ){
        $msg = sprintf( 'Minimum PHP version required is %1$s but you are running %2$s.', VISUALCROSSINGWFCST_PHP_VERSION_REQUIRED, PHP_VERSION );
        $requirement_error['php_version'] =  esc_html__( $msg, 'visualcrossingwfcst-text-domain');
    }
    //WP Version check
    if( version_compare(get_bloginfo('version'), VISUALCROSSINGWFCST_WP_VERSION_REQUIRED, '<') ){
        $msg = sprintf( 'Minimum WordPress version required is %1$s but you are running %2$s.', VISUALCROSSINGWFCST_WP_VERSION_REQUIRED, get_bloginfo('version') );
        $requirement_error['wp_version'] =  esc_html__( $msg, 'visualcrossingwfcst-text-domain');
    }

    if(empty($requirement_error)){return false;}
    else{return $requirement_error;}
}
However, the main piece of code here is the constructor. This code sets up the actions and hooks that cause the WordPress core code to call our plugin at the necessary times. As you can see in the code below, we need to setup the language files for the descriptors, the activation action, the admin action, and our initialization routine. We will explain more detail on these in the appropriate sections below.
public function __construct() {

    //Define Defaults
    $this->define_defaults();

    //Load plugin languages
    add_action( 'plugins_loaded', array( $this, 'plugin_text_domain') );

    //Load plugin requirements so can be accessed/checked
    add_action( 'plugins_loaded', array( $this, 'requirements_load'), 10 );

    //On plugin activation | Don't activate if requirements not met
    register_activation_hook( __FILE__, array( $this, 'plugin_activation' ) );

    // Admin end: We need to inform user if requirements error
    add_action( 'admin_notices',  array( $this, 'admin_requirement_check' ) );

    //Initiate Plugin
    add_action( 'plugins_loaded', array( $this, 'plugin_init'), 15 );
}
Building the admin interface
Our plugin needs an administrator interface where a WordPress administrator can setup the required parameters and defaults. Here the admin can configure the Visual Crossing Weather API key and default values for the location, the unit display, and more. This interface goes in the main.php file under our admin folder.
In our constructor we set up the hooks that are needed to display our admin menu and interface.
public function __construct() {

    //Admin Menu
    add_action( 'admin_menu', array($this, 'visualcrossingwfcst_admin_menu'), 9 );

    //Add content link
    add_filter( "plugin_action_links", array($this, 'visualcrossingwfcst_add_context_link'), 10, 2 );
}
We then need to setup the admin menu itself. We do so by using the the WordPress add_options_page() function. In this function we are also provide our function name visualcrossingwfcst_admin_settings_page where we will put our HTML & CSS code for plugin admin setting page. Our setup code looks like this.
public function visualcrossingwfcst_admin_menu(){

    $label = esc_html__('Weather Forecast Settings', 'visualcrossingwfcst-text-domain');

    add_options_page(
        $label, // page_title
        $label, // menu_title
        'manage_options', // capability
        'visualcrossingwfcst', // menu_slug
        array( $this, 'visualcrossingwfcst_admin_settings_page' ) // function
    );
}
We then must define our visualcrossingwfcst_admin_settings_page function itself that generates the HTML for the admin content. The code itself is too long to paste here and is primarily normal PHP. If you want to see the details, you can find the full code for this function along with all the plugin code. Below you can see the HTML output.
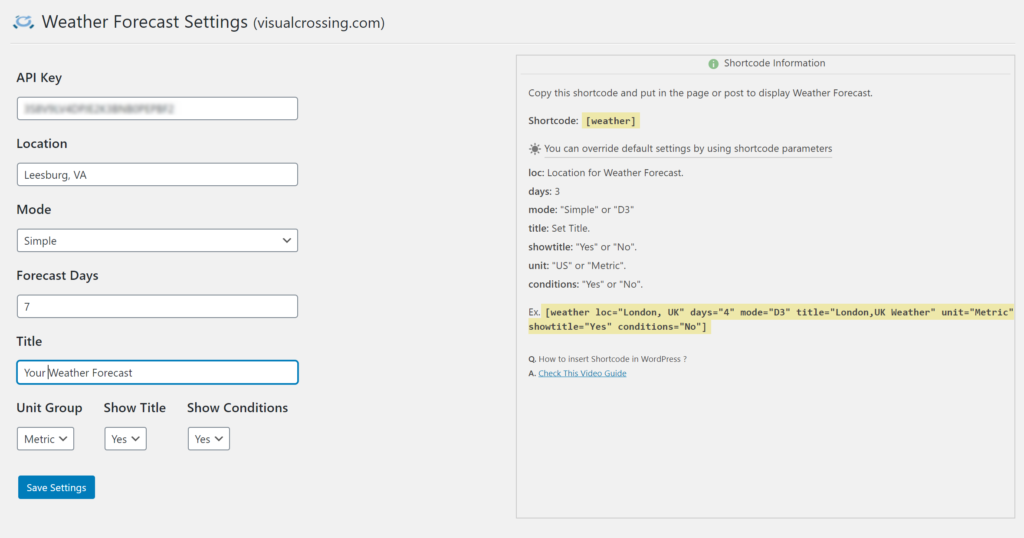
In this admin settings page we show the html form fields to get the default values needed for our plugin. We store all this data in a WordPress option table using the build-in function update_option(). However, these parameters will also be available as shortcode attributes. This allows the content author who uses our shortcode to override the defaults. For example, the user can put [[weather]] on one page to show a weather forecast with the default, saved parameters and [[weather loc=”London, UK”]] to show a weather forecast for London.
These are the options available as shortcode attributes.
- loc – Location for the weather forecast
- days – The number of days for the weather forecast
- mode – The type of display, “simple” or a more visual interesting D3 visualization
- title – The title of the weather display
- showtitle – Indicates if the weather display title is shown
- units – The unit system in which to display the weather data
- conditions – Indicates if weather conditions should be shown on the weather display
Building the front-end weather display
After completing the admin page we need to create our custom shortcode that does the work to show our weather forecast in the WordPress output. For this we will use WordPress shortcode function add_shortcode() in the constructor of main.php in the “front” front end code directory. This tells WordPress to call the function weather_shortcode_func when the content being rendered includes our plugin shortcode [[weather]] . We also configure our actions so the WordPress will call our setup code appropriately.
public function __construct() {
    //Need Ob Started
    add_action('init', array($this,'weather_output_buffer') );

    //add shortcode
    add_shortcode( 'weather', array($this,'weather_shortcode_func') );

    //Register our scripts
    add_action('wp_enqueue_scripts', array($this,'weather_register_scripts'), 999 );
}
We now need the main action portion of our plugin, the code. This is the code that renders the weather content into the output. The code snippet for this is a bit long but it is pretty simple to follow. First we load the default values for our parameters from the table that we set up in the admin page. We then override these defaults with any values specified as attributes in the shortcode. WordPress passes those into our function as an attribute array.
Finally we generate the required JavaScript code using these parameters and add this JavaScript code into the WordPress output using WordPress built-in function wp_add_inline_script(). The two cases, “simple” view versus D3 view, makes the code look more complex, but both code branches are essentially the same except for the JavaScript weather forecast generator being called. Note the ‘before’ parameter in the wp_add_inline_script() call. That ensures that this JavaScript code is added before our own script that we include below it.
	public function weather_shortcode_func($atts){

		$default = array('api'=>'', 'loc'=>'', 'days'=>7, 'mode'=>'simple', 'unit'=>'metric', 'title'=>'', 'stitle'=>'y', 'scond'=>'y');
		$settings = get_option('_visualcrossingwfcst_settings', false);
		if(is_array($settings)){
			$default = array_merge($default, $settings);
		}


		if(trim($default['api'])==''){return '';}

		$atts = shortcode_atts( array(
										'loc' => $default['loc'],
										'days' => $default['days'],
										'mode' => $default['mode'],
										'unit' => $default['unit'],
										'title' => $default['title'],
										'showtitle' => $default['stitle'],
										'conditions' => $default['scond'],
									),
								 $atts
							  );

		$atts['api'] = $default['api'];
		self::$add_script  = true;
		$widget_id = uniqid();

		$api = trim($atts['api']);
		$loc = trim(strtolower($atts['loc']));
		$days = (int)trim($atts['days']);
		if($days <= 0 ){$days=7;}

		$mode = trim(strtolower($atts['mode']));
		if($mode !='simple' && $mode !='d3'){
			$mode = 'simple';
		}

		$unit = trim(strtolower($atts['unit']));
		$title = strip_tags(trim($atts['title']));
		$showtitle = trim(strtolower($atts['showtitle']));
		$conditions = trim(strtolower($atts['conditions']));

		if($unit !='us' && $unit !='metric'){
			$unit = 'metric';
		}


		$include_script = '';
		if($mode=='simple'):

			ob_start();
			?>
			window.weatherWidgetConfig.push({
			   selector:".weatherWidget-<?php echo $widget_id; ?>",
			   apiKey:"<?php echo $api; ?>", //lots of usage? Sign up for your personal key
			   location:"<?php echo $loc; ?>", //enter an addres
			   unitGroup:"<?php echo $unit; ?>", //"us" or "metric"
			   forecastDays:<?php echo $days; ?>, //how many days forecast to show
			   title:"<?php echo $title; ?>", //optional title to show in the
			   showTitle:<?php if($showtitle=='y'){ echo 'true';}else{ echo 'false';} ?>,
			   showConditions:<?php if($conditions=='y'){ echo 'true';}else{ echo 'false';} ?>
			});
			<?php
			$include_script = ob_get_contents();
			ob_end_clean();
			$this->scripts['simple_'.$widget_id] = $include_script;
			wp_add_inline_script('wfmsmpl-js', $include_script, 'before');

		elseif($mode=='d3'):

			ob_start();
			?>
			window.weatherWidgetConfig.push({
			   selector:".weatherWidget-<?php echo $widget_id; ?>",
			   apiKey:"<?php echo $api; ?>", //lots of usage? Sign up for your personal key
			   location:"<?php echo $loc; ?>", //enter an addres
			   unitGroup:"<?php echo $unit; ?>", //"us" or "metric"
			   forecastDays:<?php echo $days; ?>, //how many days forecast to show
			   title:"<?php echo $title; ?>", //optional title to show in the
			   showTitle:<?php if($showtitle=='y'){ echo 'true';}else{ echo 'false';} ?>,
			   showConditions:<?php if($conditions=='y'){ echo 'true';}else{ echo 'false';} ?>
			});
			<?php
			$include_script = ob_get_contents();
			ob_end_clean();

			$this->scripts['d3_'.$widget_id] = $include_script;
			wp_add_inline_script('wfmd3-js', $include_script, 'before');

		endif;

		return '<div class="weatherWidget-'.$widget_id.'"></div>';
	}
The weather forecast itself is generated by the Visual Crossing Weather JavaScript. There is a separate tutorial on how this JavaScript works and how to use it. In our case the plugin calls this JavaScript and uses its output directly, but it could be enhanced to show weather in different ways or formats. It could even show different weather entirely such as historical weather which is also supported by the Visual Crossing Weather API.
Building the uninstaller
Finally, all WordPress plugins need an uninstaller. Having one allows our plugin to do the “best practices” task of removing all of its data when the WordPress administrator requests the we uninstall ourselves. Our plugin’s PHP code for this can be found at the top level of our directory structure in the file named uninstall.php.
In our case, our plugin stores only one piece of persistent data, and that is the default parameter list. Thus our uninstall code is trivial; it simply deletes those settings by their name, _visualcrossingwfcst_settings.
//Deleting Options
delete_option('_visualcrossingwfcst_settings');
Internationalization
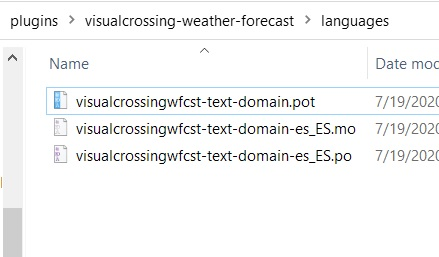
Although not exactly code, we will briefly discuss the contents of the languages directory. This is where descriptors are stored for each language that our plugin wants to support. Each string in our plugin’s user interface should have a entry in each language file. That will allow our interface to show in the proper language wherever possible.
The .POT file contains the default strings in English. Beyond that we can add pairs of .PO and .MO files for each language translation that we want to support. When a local translation is not available, WordPress will show the default string from the .POT file. You can create and manage these descriptor files easily in a tool such as POEdit, POEditor, or any of their numerous competitors. In the screenshot below, we have Spanish strings in addition to the defaults.
Seeing the final results
To see the results of our hard work, all we have to do is build our final ZIP, install it into WordPress, set up our Visual Crossing Weather API key (and other default parameters if we desire) in the admin interface, and insert our new shortcode into some content.

Once installed, we navigate to our WordPress plugins list, find the Visual Crossing Weather plugin, and select the settings option. These setting were described in the admin interface section above, so we won’t rehash that content here. However, at minimum to use the plugin, we will need to insert our Visual Crossing Weather API key. Your API key can be found in your Visual Crossing Weather account page. If you don’t already have an API key, you can sign up for a free trial in seconds.
Now we are ready to use the plugin’s shortcode in our content. For anyone using a modern version of WordPress with the block editor enabled, you can make a shortcode block by selecting it as the block type during content creation. Simply click the “plus” icon to insert a new block, search for the shortcode block type by typing the first few letters of “shortcode,” and then select a shortcode block from the list.
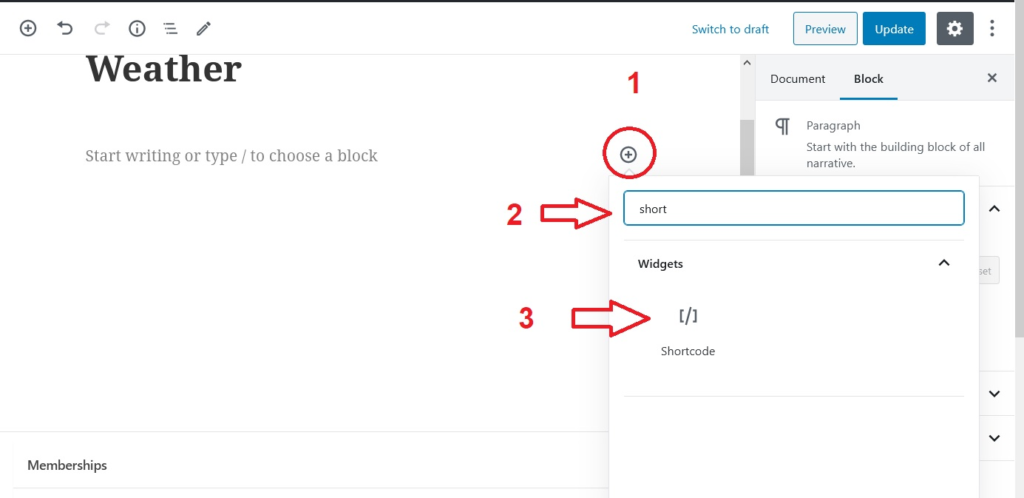
The block itself will now prompt for the name of the shortcode that we want to use. In the case of our plugin, the shortcode name is [[weather]] so we simply enter it into the block text.
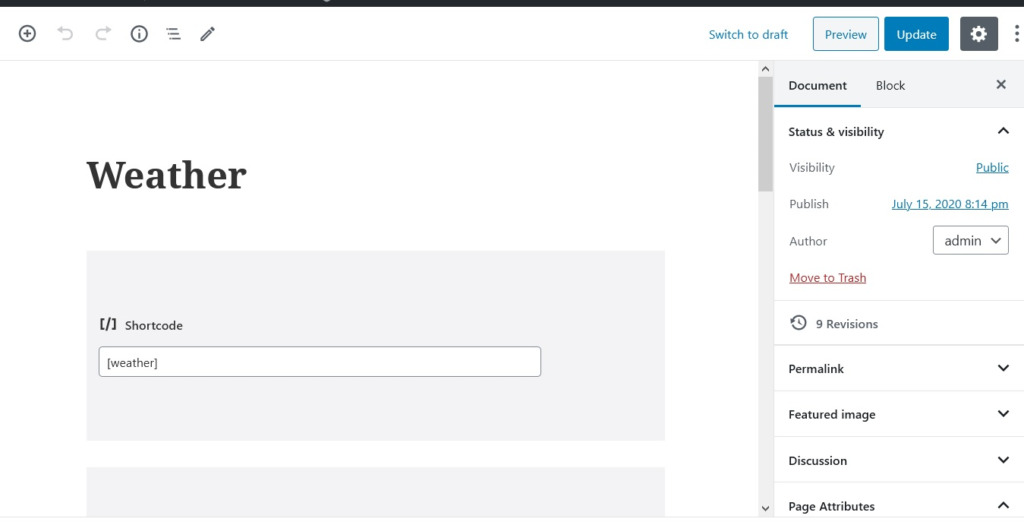
That’s it. All we need to do is to open up the sample WordPress page that we just created as a preview, and we will see the weather forecast displayed directly within page.


Summary
We hope that you have enjoyed this whirlwind tour of creating a weather forecast plugin for WordPress. As you can see, the process of creating a WordPress plugin from scratch is not at all complex. If you want to learn more or experiment on your own, remember that the entire code for this working plugin is available for you to download. Likewise, if you want to use weather or historical weather in your own WordPress plugin or for any other purposes, check out Visual Crossing Weather‘s data and API options.
Questions or need help?
If you have a question or need help, please post on our actively monitored forum for the fastest replies. You can also contact our Support Team.